介绍一下家庭服务器使用的硬件和软件配置情况。
零. 前言
部署home nas已经有段时间了,将之前踩过的的一些坑梳理一下,做下总结。
一. 硬件
1. x86 硬件
- aio
cpu: i5-11500t
ram: 32G x 2
nic: x540-T2 x 1(10G x 2),RTL8125 2.5GbE x 1
disk: 2t nvme x 1, 4T HHD x 6
- Game Station
cpu: i5-11500
ram: 16G x 4
nic: RTL8125 2.5GbE x 1, ax210 x 1
disk: 1t nvme x 1, 2T SSD x 2
gpu: RTX 3060 mini
2. arm64 硬件
-
sev:
cpu: rk3588
disk: 1t nvme
ram: 16G
-
rpi4 x 2:
cpu: Broadcom BCM2711, Quad core Cortex-A72 (ARM v8) 64-bit SoC @ 1.8GHz ram: 4G
3. 交换机
ikuai 2.5G router 支持 2.5G x 8 和万兆光上行
4. qnap 301w
满血wifi6, 10G x 2, 1G x 4
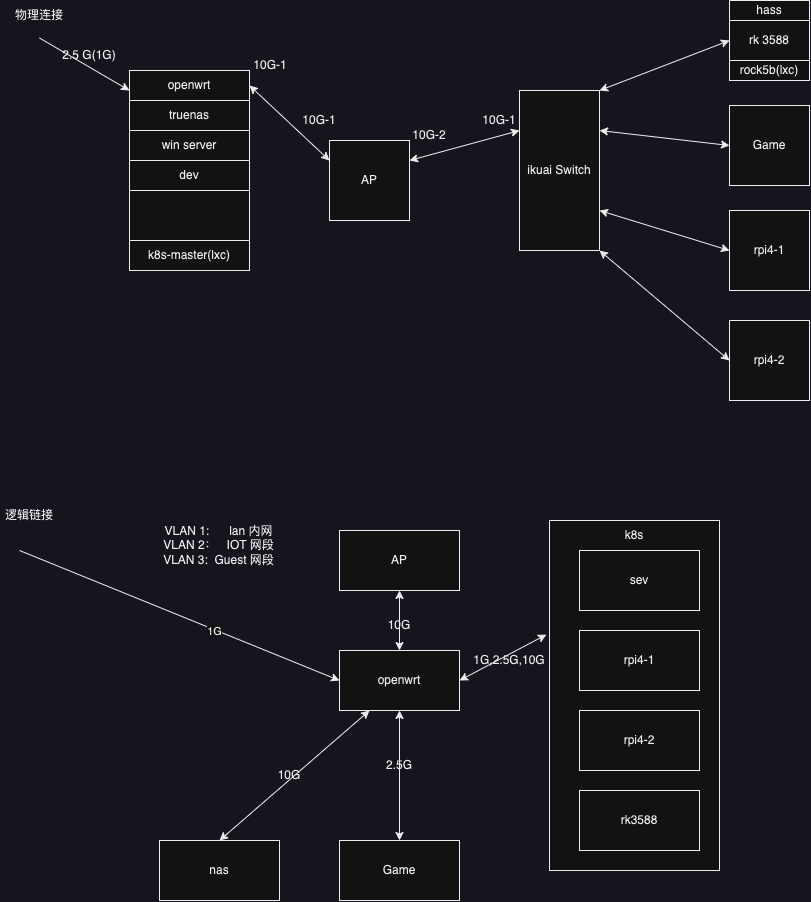
二. 网络拓扑
家用主要将访客,物联网和日常网段划分使用。未对存储和业务划分对应专属网段(没必要?)。
lan: 192.168.18.1/24
Iot: 192.168.32.1/24
Guest: 192.168.100.1/24
其中lan 区域
- 192.168.18.1 主软路由
- 192.168.18.2 lan AP地址
- 192.168.18.7 aio pve地址
- 192.168.18.13 master k8s master地址
- 192.168.18.14 rock5b k8s rock5b node 地址
- 192.168.18.15 rpi4-1 k8s rpi4-1 node 地址
- 192.168.18.16 rpi4-2 k8s rpi4-2 node 地址
- 192.168.18.25 truenas nas地址
- 192.168.18.32 homeassistant hass 地址
- 192.168.18.100-200 lan dhcp 地址
IOT 区域
- 192.168.32.2 IOT AP地址
- 192.168.32.3 hass 地址
- 192.168.32.100-200 IOT dhcp 地址
Guest 区域
- 192.168.100.2 Guest AP地址
- 192.168.100.100-200 Guest dhcp 地址
VPN 区域
- 172.28.0.0/16
VPN 路由规则
- 192.168.18.0/24 via 172.28.168.8
三. 底层系统安装
1. pve 安装(x86)
- 下载ISO
- BIOS修改相关设置
- Secure Boot
- SRIOV
- FastBoot
- 刷写ISO到U盘,或者使用ventoy
- 按正常步骤安装pve
- 开启iommu
vim /etc/default/grub在GRUB_CMDLINE_LINUX_DEFAULT中加入下面内容intel_iommu=on iommu=pt - 开启sriov
检查网卡是否支持sriov
lspci -s 02:00.0 -vvv | grep Capabilities
        Capabilities: [40] Power Management version 3
        Capabilities: [50] MSI: Enable- Count=1/1 Maskable+ 64bit+
        Capabilities: [70] MSI-X: Enable+ Count=64 Masked-
        Capabilities: [a0] Express (v2) Endpoint, MSI 00
        Capabilities: [e0] Vital Product Data
        Capabilities: [100 v2] Advanced Error Reporting
        Capabilities: [150 v1] Alternative Routing-ID Interpretation (ARI)
        Capabilities: [160 v1] Single Root I/O Virtualization (SR-IOV)
        Capabilities: [1d0 v1] Access Control Services
存在Capabilities: [160 v1] Single Root I/O Virtualization (SR-IOV)即支持sriov。
使用systemd service在开机时启动nic的sriov
vim /etc/systemd/system/sriov.service填入以下内容
注意:
- enp2s0f0 是我pc的网卡,需要修改成自己pc的对应网卡
[Unit]
Description=Script to enable SR-IOV on boot

[Service]
Type=simple
ExecStartPre=/usr/bin/bash -c '/usr/bin/echo 6 > /sys/class/net/enp2s0f0/device/sriov_numvfs'
ExecStartPre=/usr/bin/bash -c '/usr/bin/ip link set enp2s0f0 up'
ExecStartPre=/usr/bin/bash -c '/usr/bin/ip link set enp2s0f0 vf 0 mac fe:eb:98:20:68:77'
ExecStartPre=/usr/bin/bash -c '/usr/bin/ip link set enp2s0f0 vf 1 mac 32:ec:28:b3:f8:36'
ExecStartPre=/usr/bin/bash -c '/usr/bin/ip link set enp2s0f0 vf 2 mac 1a:2c:d1:69:e4:66'
ExecStartPre=/usr/bin/bash -c '/usr/bin/ip link set enp2s0f0 vf 3 mac 4e:39:21:92:5f:00'
ExecStartPre=/usr/bin/bash -c '/usr/bin/ip link set enp2s0f0 vf 4 mac 92:32:89:31:0b:9a'
ExecStartPre=/usr/bin/bash -c '/usr/bin/ip link set enp2s0f0 vf 5 mac 6a:a0:55:be:ca:11'
ExecStart=/usr/bin/bash -c '/usr/bin/echo done'
Restart=on-failure

[Install]
WantedBy=multi-user.target
1. openwrt 虚拟机安装
pve创建虚拟机,不选择iso media然后使用qm import disk 导入 openwrt 的镜像。
qm disk import 100 ./openwrt-xxx-xxx-generic-squashfs-combined-efi.img local-lvm
pci 直通一个sriov网卡作为LAN口。
pci 直通RTL8125 2.5G 网口作为WAN口。
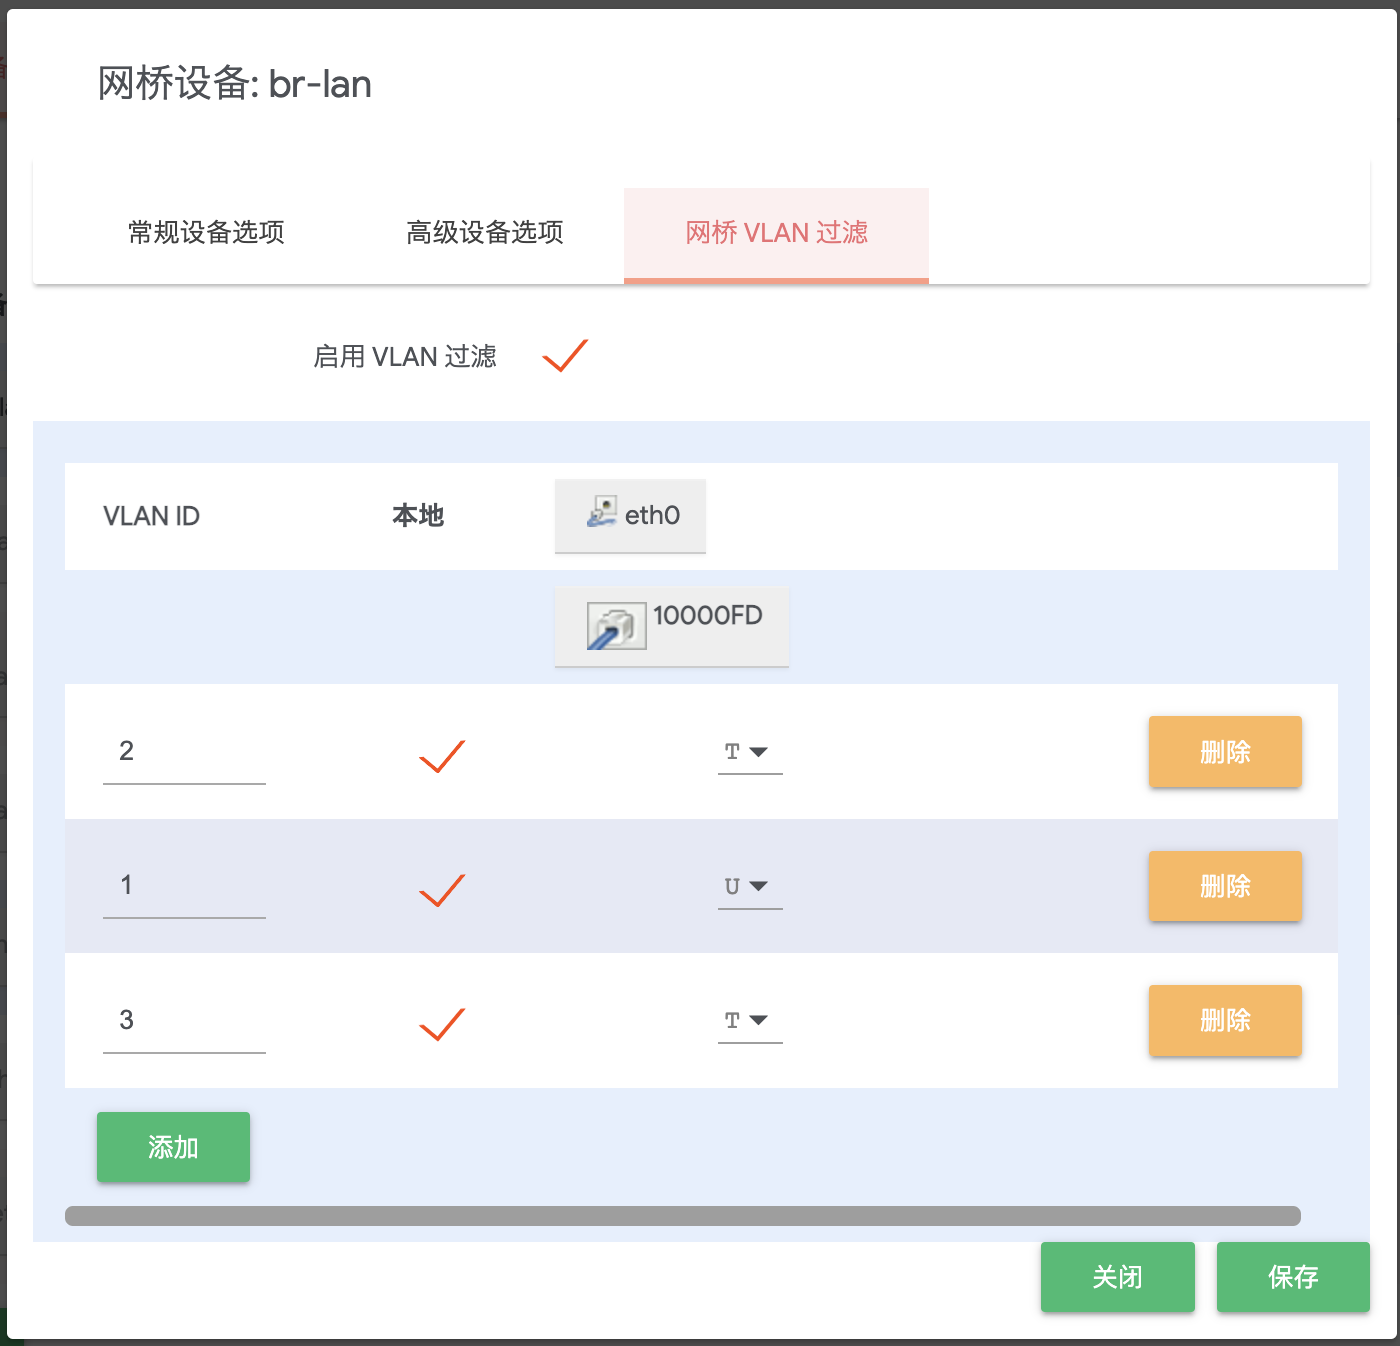
OP vlan划分
在OP网桥设置
VLAN 1: 在LAN上未Untag,默认加入到18网段
VLAN 2: 在LAN上打Tag
VLAN 3: 在LAN上打Tag
2. truenas 安装
安装truenas scale,基于debain系统可方便开启Qemu User Agent
配置LAN地址192.168.18.25
3. k3s master in lxc
首先开启 pve 的转发功能
sysctl net.ipv4.ip_forward=1
sysctl net.ipv6.conf.all.forwarding=1
sed -i 's/#net.ipv4.ip_forward=1/net.ipv4.ip_forward=1/g' /etc/sysctl.conf
sed -i 's/#net.ipv6.conf.all.forwarding=1/net.ipv6.conf.all.forwarding=1/g' /etc/sysctl.conf
创建lxc容器后修改lxc配置
cat /etc/pve/lxc/200.conf

arch: amd64
cores: 6
features: fuse=1,mknod=1,mount=nfs;cifs,nesting=1
hostname: master
memory: 8192
ostype: debian
rootfs: local-lvm:vm-200-disk-0,size=128G
swap: 0
tty: 1
lxc.net.0.type: phys
lxc.net.0.name: eth0
lxc.net.0.link: enp2s0f0v5
lxc.apparmor.profile: unconfined
lxc.cap.drop:
lxc.mount.auto: "proc:rw sys:rw"
lxc.cgroup2.devices.allow: c 10:200 rwm
lxc.cgroup2.devices.allow: c 226:0 rwm
lxc.cgroup2.devices.allow: c 226:128 rwm
lxc.mount.entry: /dev/dri/card0 dev/dri/card0 none bind,optional,create=file
lxc.mount.entry: /dev/dri/renderD128 dev/dri/renderD128 none bind,optional,create=file
k3s 需要一下配置
lxc.apparmor.profile: unconfined
lxc.cap.drop:
lxc.mount.auto: "proc:rw sys:rw"
lxc.cgroup2.devices.allow: c 10:200 rwm
然后在lxc中开启宿主机挂载点共享
echo '#!/bin/sh -e
ln -s /dev/console /dev/kmsg
mount --make-rshared /' > /etc/rc.local
chmod +x /etc/rc.local
reboot
最后开始安装k3s
2. pve 安装(arm64)(暂时未安装arm64 pve)
首先按照rock5b官方指导刷写debian系统到nvme中,刷写spi到sd卡。
然后使用foxi的pve-arm64仓库安装pve-manager
1. arm64 hass 安装
创建虚拟机不使用iso且不创建默认启动磁盘,arm64虚拟机需要uefi引导,需要efi disk。 然后使用下面命令导入下载的hass镜像
qm disk import
扩容到16G
2. k3s in lxc
同x86
3. rpi4 网络启动
四. hass 接入与个人 cloud game
hass 俩ip
192.168.32.3 IOT网段链接
192.168.18.32 LAN网段访问
1. windows唤醒与关机
WOL与RPC shutdown
BIOS 开启 WOL,windows 网卡配置开启WOL与魔术包唤醒
hass 创建一个 package
注:
1. 官方 ha 中不包含 samba 相关组件,所以无法调用 net rpc 相关命令
windows:
  switch:
    - platform: wake_on_lan
      name: windows_game
      mac: D8:BB:C1:59:7A:17
      host: 192.168.18.154
      turn_off:
        service: shell_command.windows_shutdown
        data:
          ip: 192.168.18.154
          user: !secret windows_tsic

  shell_command:
    windows_shutdown: net rpc shutdown -I {{ ip }} -U {{ user }} -t 60 -C "Home Assistant is shutting down this PC. This cannot be canceled. Please save your work!"

  homeassistant:
    customize:
      switch.windows_game:
        friendly_name: Game Station
        icon: mdi:microsoft-windows
2. 串流方案
sunshine + moonlight
parsec
3. 远程桌面
Microsoft Remote Desktop
五. 常用服务部署
1. zerotier VPN使用
- 注册zerotier
- 创建一个网络
- 对应设备安装zerotier,然后加入该网络中
- 创建路由规则,让访问lan的流量从OP转发。
2. jellyfin 搭建
- lxc 支持 dri 挂载
- 编写 k8s 配置
- 部署 jellyfin
- Live TV